

Accessories, Gear and Kit.

The bike
My bike is a 2002 BMW R1150GS Adventure. Its birthplace is Germany and it was purchased in Manhattan NYC by the original owner. I am the second owner. It has 85 horsepower at 6,750 rpm and it includes the optional heated hand grips, oversized gas tank (7.9 U.S. gallons) and ABS brakes.
The original owner rode it for about 25,000 miles and used it for on road travel locally in the New Jersey and Virginia area. When I purchased it was in pristine condition.
The original owner added a Garmin GPS (now removed), the BMW side case inside bags, an intercom communication system to be used between rider and passenger, a Touratech side stand extended foot, a Touratech front fork “thingy” plate, a Touratech center stand skid plate, Touratech windscreen extender, modulated tail light (blinks when activated then blinks faster) and PIAA off-road driving lights. He had it pretty much, what they call, “farkled”.
This is what it is like trying to ride a big bike through narrow places.
Why ride such a big bike?
So why did I buy this specific bike? Originally I wanted something much smaller and lighter, something like a Kawasaki KLR, a Honda XL/XR or a Suzuki DR/DRZ. These bikes are smaller displacement 600cc chain-driven bikes that are more off-road oriented. That kind of bike would have been ideal in more off-road situations I would encounter. However, due to the fact that I need to ride on highways and interstates for 2500 miles to the Mexican border, I would need something that was more highway worthy, could maintain a higher highway speed for long distance and would be more comfortable. That fact alone limited me to a larger displacement, more highway worthy bike. Additionally, these big adventure bikes like the BMW are already set up to carry luggage. This one came equipped with two aluminum side cases/panniers and an aluminum top box, complete with BMW luggage bags that could be pulled out. The smaller displacement bikes I considered would either have to be configured to carry less luggage weight or would have to have their subframes reinforced to carry luggage. I considered the larger KTM Adventure bike as well but I landed on this particular BMW due to the availability of parts down in Mexico and Central America. Plus, this bike is purpose built for long-distance world travel. I can’t think of another bike that was built so specifically for this purpose. It has the optional, over-sized gas tank (almost 8.0 US gallons!), the fueling system adjusts for “poor” fuel when riding in foreign countries, greater suspension travel for some off-road use and other features that made my decision that much easier. When it came to cost I just so happened to find this babied bike with all the accessories I would have to add to another bike. This bike seemed (and was) perfect for the adventures I had planned. It was a heavy pig of a bike that sounded like a tractor but it was practical.

My 2002 BMW r1150gs Adventure
The face that only a parent can love. Larger sized low beam headlight, smaller high beam headlight and a beak like a bird. All practical and esthetically questionable. I’ve grown to love this bike’s looks.
I wasn’t sure about the looks of this bike when I first started considering it. It’s an odd looking bike, that’s for sure. The low beam headlight is larger than the high beam headlight situation directly next to it. It has a strange beak of a front fender and the two cylinders are stationed sticking out the sides of the bike instead of situated in the typical twin V formation or inline like they are on my GSXR. It is definitely something different but it grew on me.
When I found this bike for sale in Virginia I was driving a truck over the road running around the lower U.S. 48 states. I don’t remember exactly where I was when I pulled the trigger on the purchase but I know I was far away. Near the Oregon coast if I remember correctly. I was hounding the owner of the bike to sell it to me but he already felt obligated to some guy that swore he was going to buy it. But this was Craigslist and Craigslist has “Craigslist flakes”. I spent about a week or so on edge hoping that this guy that swore he was going to buy it would become the flake. He flaked using the excuse that his wife was against the purchase. The original owner contacted me, I wired $8000 dollars to my parents and begged for them to purchase the bike for me with the money I wired. The owner trailered the bike down to Williamsburg, Virginia for the cost of $100 transport fees and the deal was made. Sight unseen I purchased this bike. I had seen pictures of it and talked to the owner a few times on the phone but I never saw the bike in person before I bought it. Life is good. The bike awaited me in Virginia for when I would quit my job, meet my new riding partner and begin the adventure.

Me and my buddy
This is “Cannoli”, my Cavalier King Charles Spaniel on one of his first rides with me.
Since that original purchase and mostly since that last adventure I have done the following modifications. I upgraded the stock, skinny foot pegs with Pivot Pegs. These not only pivot with your feet but they are wider and grippier. One of the biggest and most expensive upgrades I have applied to this bike is the suspension. I upgraded the stock suspension (which was blown out on the last trip and was mostly garbage) to HyperPro suspension from EPM Performance in Englishtown, New Jersey. I removed the GPS unit the original owner installed since I couldn’t update the maps and it wasn’t really needed. Paper maps and asking strangers how to go somewhere is the right way. I upgraded the battery, replaced the starter, installed the windshield extension from Touratech, removed the aluminum top box and replaced it with a soft, waterproof duffel bag, added a Ram Mount cellphone holder and added a bunch of stickers and reflective labels.
ACCESSORIES
On the last trip I dropped one of the side cases lids after the inadequate BMW hinges failed causing one of the side case lids to fly off in Belize and get run over before I could go back and claim the damaged lid. Since then the other hinges on the side case broke. That lid flew off on Route 35 on my way to Sandy Hook Park. That lid, once I back tracked and found it lying in the middle of Route 35, looked like it had been run over by fifteen trucks. So I purchased a replacement lid from some guy in California and bypassed the stock BMW hinges and use Masterlock padlocks and some Amazon free delivery cables to secure the lids and contents on my cases. I added a couple of Heyday Goods bicycle, USB rechargeable headlights mounted to my front blinker stalks for additional lighting in case of emergency.

Mitas E07 Dakar
Mitas E07 Dakars are a 50/50 tire designed for dualsport/adventure bikes. The Dakar version of the E07 is designed for heavier loads and more extreme conditions with a thicker sidewall to resist punctures.
I’ve been using the Dakars on both front and back for a few years after trying many other tires. These tires are a great compromise between longevity, wet weather traction and off road use.
For tires I used Mitas E07 Dakar front and rear tire currently installed and I am riding down with an extra Mitas E07 rear Plus strapped to the back.
I have a charger (Cllena DIN Hella Powerlet Plug to Dual Quick Charge 3.0 USB Charger Adapter with LED Voltmeter for BMW Motorcycle (Blue) that plugs into one of the outlets to charge my cellphone.
tankbag

Tankbag contents
My tankbag contents are something I may need to access while riding or at a quick pitstop.
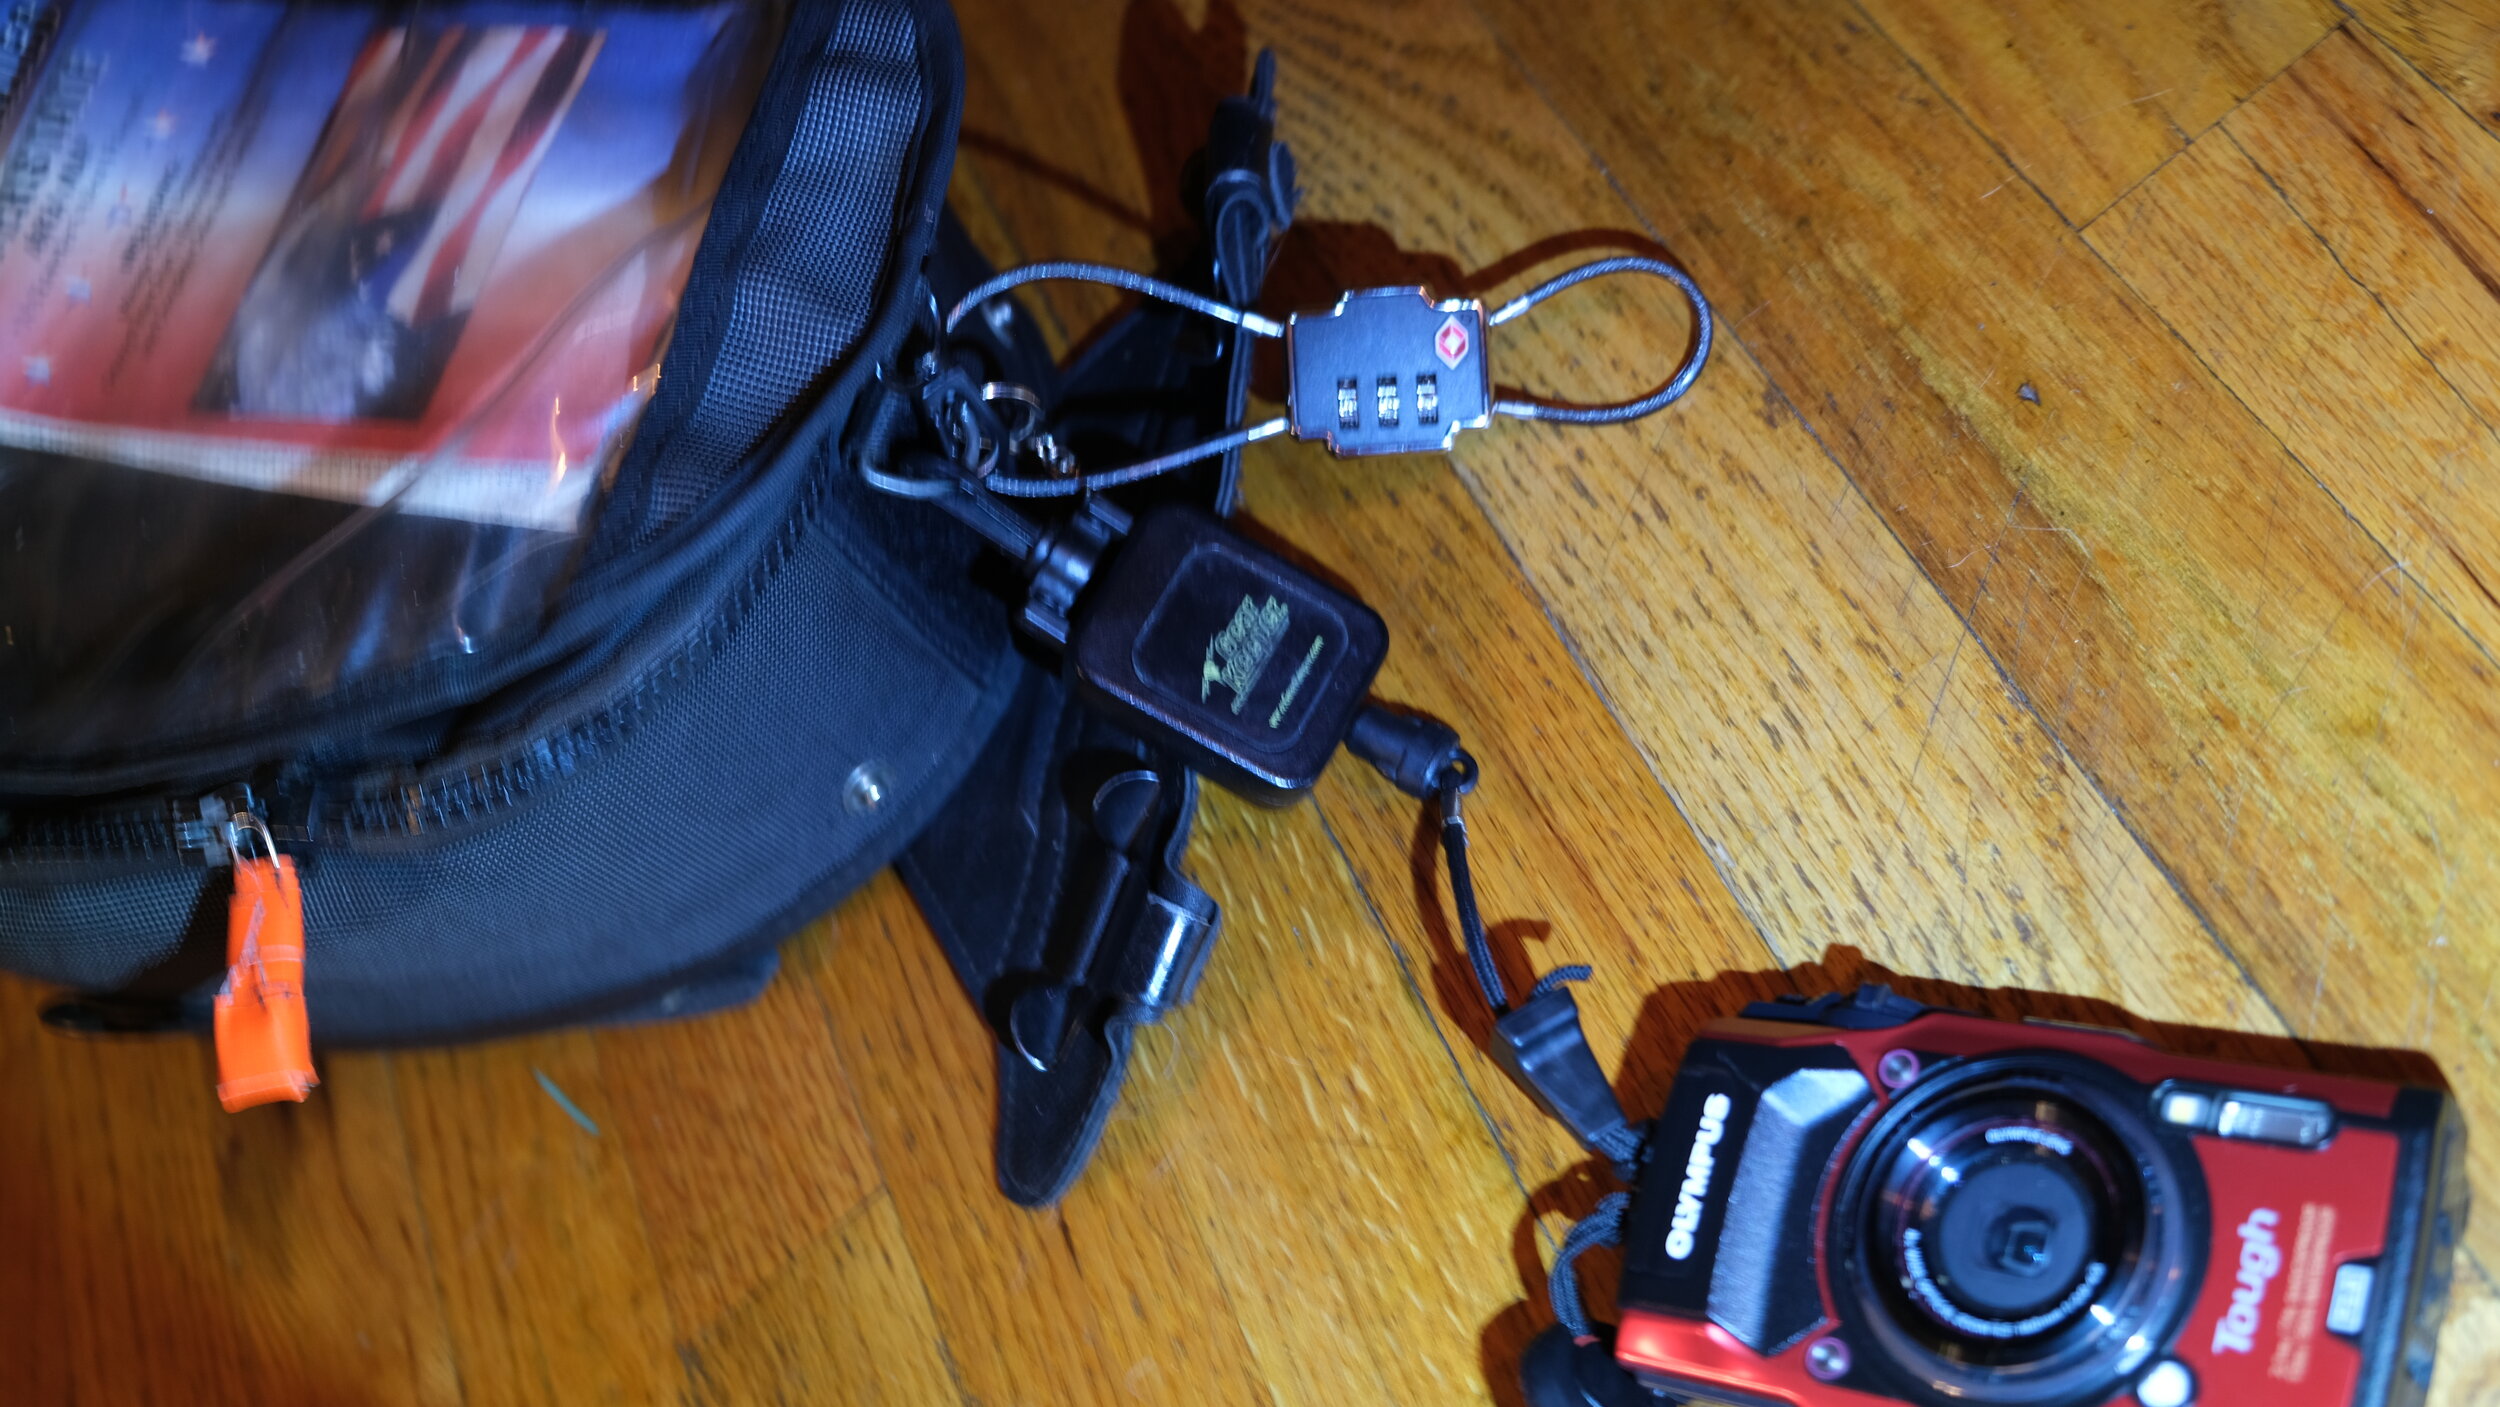
My tankbag and it’s contents are some of the most important objects in my travels. My tankbag is the bag the original owner included with the bike. It’s a BMW emblemed tankbag and I have no idea how much this cost. I’m sure it was overpriced but I like it. It’s expandable, magnetic and basic. It works. It has an attached map window in the top, a small zippered pocket below the map window and a separate, zippered compartment towards my crotch. I integrated a cable locking system into the main compartment zipper so I can lock it’s contents closed when I walk away. Additionally, I purchased another cable locking system to lock it to the bike should the need arise (at a border crossing, etc.).
So, what do I put in my tankbag? The picture above demonstrates some of what I include. I have a anti-bacterial spray, a couple of individually packaged Shout wipes, a visor cleaning spray for my helmet visor, the locks and cable to secure it to the bike when needed, my glove liners, a compact and rechargeable headlamp, a daytime and nighttime riding sunglasses, the waterproof tankbag cover it came with, a riding neck gaiter for those in between temperatures, two Rite-In-The-Rain (from Tacoma, WA!) journals to write down my thoughts and places I travel every day and night, Freeze-Out glove liners and a full burka for snowmobiling (or cold weather motorcycle riding) and whatever map for the country I’m currently riding within.
Some more details of my tankbag.
The Olympus TG-05 Tough camera is attached to my tank bag by a CB lanyard (I’m a trucker so repurposing my CB lanyard) so that I can grab the camera while riding to take a picture without worrying if I drop it. It will spring back to the tank bag. The combo lock is to lock the zipper closed to a fixed, metal loop so that if I step away from the bike the tank bag can’t be opened/unzipped. I have another combo/cable lock to lock the actual bag to the bike so it can’t be grabbed and stolen while I’m away from the bike for a few minutes. At night the bag comes into the room with me.
In the separate, zippered pocket that faces my crotch I keep my spare key, some mints so I don’t smoke, a tire gauge, an extendable back scratcher (just in case I get that itch), a waterproof and windproof lighter, some travel business cards and permanent marker to write down my email or website address for those I meet, some lip balm and a USB outlet charger thing to charge my phone.
Emergency equipment and repair

Emergency equipment and repair
There’s almost a little too much to list but here are some of the highlights. These items are stored inside a roll top, dry bag inside one of my side cases. They take up this entire right side case.
Whistler Jump & Go jump start kit. Tried and true, I’ve used this on both my bike and my car and it always does what it’s supposed to do. It has a separate USB port to use in an emergency to charge anything compatible like a phone, etc.
Slime Power Sport Tire compressor. Just a basic, noisy air compressor that hooks up to an already existing outlet hookup that runs directly from my battery. It’s loud and it works.
MSR 30oz. Fuel Bottles (x2). These two bottles together will equal a half a gallon of emergency fuel. Most likely I shouldn’t need to use these but last adventure I almost ran out of gas in Texas due to some poor planning on my part. These are for piece of mind.
Anker Powercore+ 26800 with hard travel case. For an emergency charging of my phone or Fuji XT-3 Camera when I don’t have an electrical outlet (camping or a really cheap motel).
Miscellaneous. I included a very basic first aid kit, a basic tire repair plug kit, Coleman emergency camping toilet paper roll and I keep another one of these in my tankbag because on the road in some places in Mexico and Central America you will find some bathrooms with no TP, emergency protein bars/replacement meals, emergency bungee tie downs, lithium AAA batteries, biodegradable wipes, emergency magnetic LED beacon for roadside emergencies, spare headlamp, miscellaneous bolts and nuts/fuel connectors/timing belt, a foldable multi-tool and heavy downpour rain pants (my Klim Dakars are barely waterproof).
gear/attire

My helmet - Nolan N104
This is the helmet that has inspired my logo. In short, it is awesome and I used it on my last trip.
It is a modular, flip up helmet with an integrated hidden, slide down sunshade, extra wide faceshield with a pinlock option to reduce fogging and a great ventilation system.
I added the TomTom Bandit camera mount seen on the side and the mohawk. Ahh, the mohawk.
I’m often asked, “Why the mohawk?”. When I left on the last trip the plan was to meet up in Creel, Mexico for a BMW meetup. I was going to meet up with an online Guatemalan riding friend that was also riding up to Creel. Since there was going to be so many other riders there, I wanted to stand out to this friend I was going to meet. I applied the rubber mohawk in anticipation of him spotting me more easily. Well, I never did make that meetup as I was literally one day late. As I rode towards Creel from Chihuahua City, I passed a bunch of other riders from the meetup going the opposite way.
Despite never meeting up with this friend at this point (we met up later in Puerto Vallarta), I left the mohawk on and it inspired a lot of future conversations with locals along my trip. I often heard “ohh, iguana!” at border crossings and from those I met along the way. So, I kept it and it remains on my helmet. Anything to inspire interactions and conversation with other while I travel is a bonus. Even it if isn’t an iguana.
Jacket
This could change but it looks like I will be riding down with the Olympia X Moto 2 Jacket. This was a tough one. I had a Firstgear Kilimanjaro jacket that I won (free) on Facebook before my last adventure. What appealed to me with choosing the right jacket was the flexibility. When I leave New Jersey in early January it will be freezing cold. However, once I get down into Central America it will be considerably warmer and possibly more humid. So I need flexibility in my gear. I researched and, considering cost, came upon the Olympia Moto 2 jacket. It has three layers. The outer shell is constructed with the most up to date protection. It is rain resistant, protective in the event of a crash and it has pockets. It also has a 2L water bladder integrated into the back of the jacket. The second layer is a waterproof jacket that can be removed and used as just a waterproof jacket for walking around. It’s high-viz yellow and black and when zippered into the jacket it makes the jacket waterproof. The third layer is a warm insulation layer that zippers into and under the waterproof layer. It is Thinsulate warm and if unzipped out of the jacket, can be work independently of the jacket for walking around.
Pants
I’m going to use my Klim Dakar pants for this trip. These are what I used last time. They are not waterproof but they are water-resistant and they have pockets in the thighs that are easy to access. They have adjustable via Velcro adjustments for getting my boots on and they have ventilated, zippered pockets for when the weather get warm. The waist has snap button closure and adjustable Velcro adjustments.
Boots
On the last trip I used Gaerne G Adventure boots. They worked pretty well overall but I found them to be a little uncomfortable for walking around. They were also slightly narrow for my wide feet. This trip I am using Forma Adventure boots in the tall and brown format. I’ve only worn them a few times riding but they feel great so far. They are known to be comfortable for walking around and they are slightly wider than the last boots. They are waterproof utilizing Drytex.
Gloves

Revit Sand 3 summer/spring gloves, fly Racing aurora 2 winter riding gloves
From the top left going clockwise, the Revit Sand 3 warmer weather gloves, the Fly Racing Aurora 2 Wet/Winter gloves and Freeze-It Warm R glove liners.
For gloves, in warmer weather, I’m using Revit Sand 3 gloves. For the colder part of the ride I am using Fox Racing Aurora 2 waterproof gloves.
backpack
The backpack I’ll be riding with is the Nelson-Rigg 40L Hurricane roll-top drybag. It can also be strapped down and used as a tail bag.

Nelson-Rigg 40L dry bag backpack. The side, outer pockets are large enough to accommodate a 30oz fuel bottle in each side pocket.

There is a removable, waterproof map pocket attached to the outside
If you detach part of the removable map pocket you can see underneath there is a separate, Velcro secured pocket that contains a 1L water bladder. The hose feeds around over the straps and clips in the front to one of the straps.

The other side of the Nelson-Rigg 40L Hurricane
This is the other side and you can see I have my SPOT GPS tracker attached to the front and a Polaroid Cube+ action camera inside it’s waterproof housing. This housing is attached securely to my backpack via a PolarPro Backpack Mount.

Camping equipment
Camping
I didn’t camp on the last trip in 2014 although I kind of wished I did. Paying for overpriced, crappy motel rooms in the U.S. while I worked my way through the 4000+ miles to and from the Mexican border burned me. Nothing like spending $60 U.S. per night for a sketchy, shady, possibly bug-infested room at a discount motel chain. I regretted this. Getting to and from Mexico is the most expensive and tedious part of my trip. So this time I’m going to try camping when possible.
I’m not a natural camper. I’ve only camped a handful of times in my life and most of the time I’ve winged it. So this next adventure will add this foreign element to the whole experience. This should be interesting and possibly comical.
Again, the weather on this trip, specifically the range of temperatures I will be experiencing, dictates my camping gear. The trip will start out very cold and once I get down into southern Mexico and Central America the weather should be considerably warmer, if not outright hot at times. Picking the right camping gear for such a range of temperatures has opened my eyes to the different options. I researched what gear would work best for these conditions with an emphasis on keeping the gear affordable and, most importantly, compact enough to carry on a motorcycle.
Tent

Two waterproof dry bags for the camping equipment.
The top bag is a drybag that contains my tent only. This will have to be strapped down on the outside of my bike.
The lower bag contains the rest of my camping equipment and will completely fill my left side case/pannier. It contains my tent stakes, sleeping pad, inflatable pillow, etc.
The tent I chose to use was the Coleman Sundome 2 person tent. On Amazon (as my go to place for 97% of my purchases) this tent had a solid rating of 4.5 out of 5 stars. It cost me, as an opened box, a whole $27 and it came in the color green. The tent is advertised as an easy 10 minute set up, utilizes a WeatherTec system of welded floors and seams as well as a rainfly to keep things dry, has a large window for ventilation and the whole thing assembled measures 7 foot by 5 feet with a height of 4 feet at the center. Sounds perfect for me.
Sleeping bag
Sleeping bag
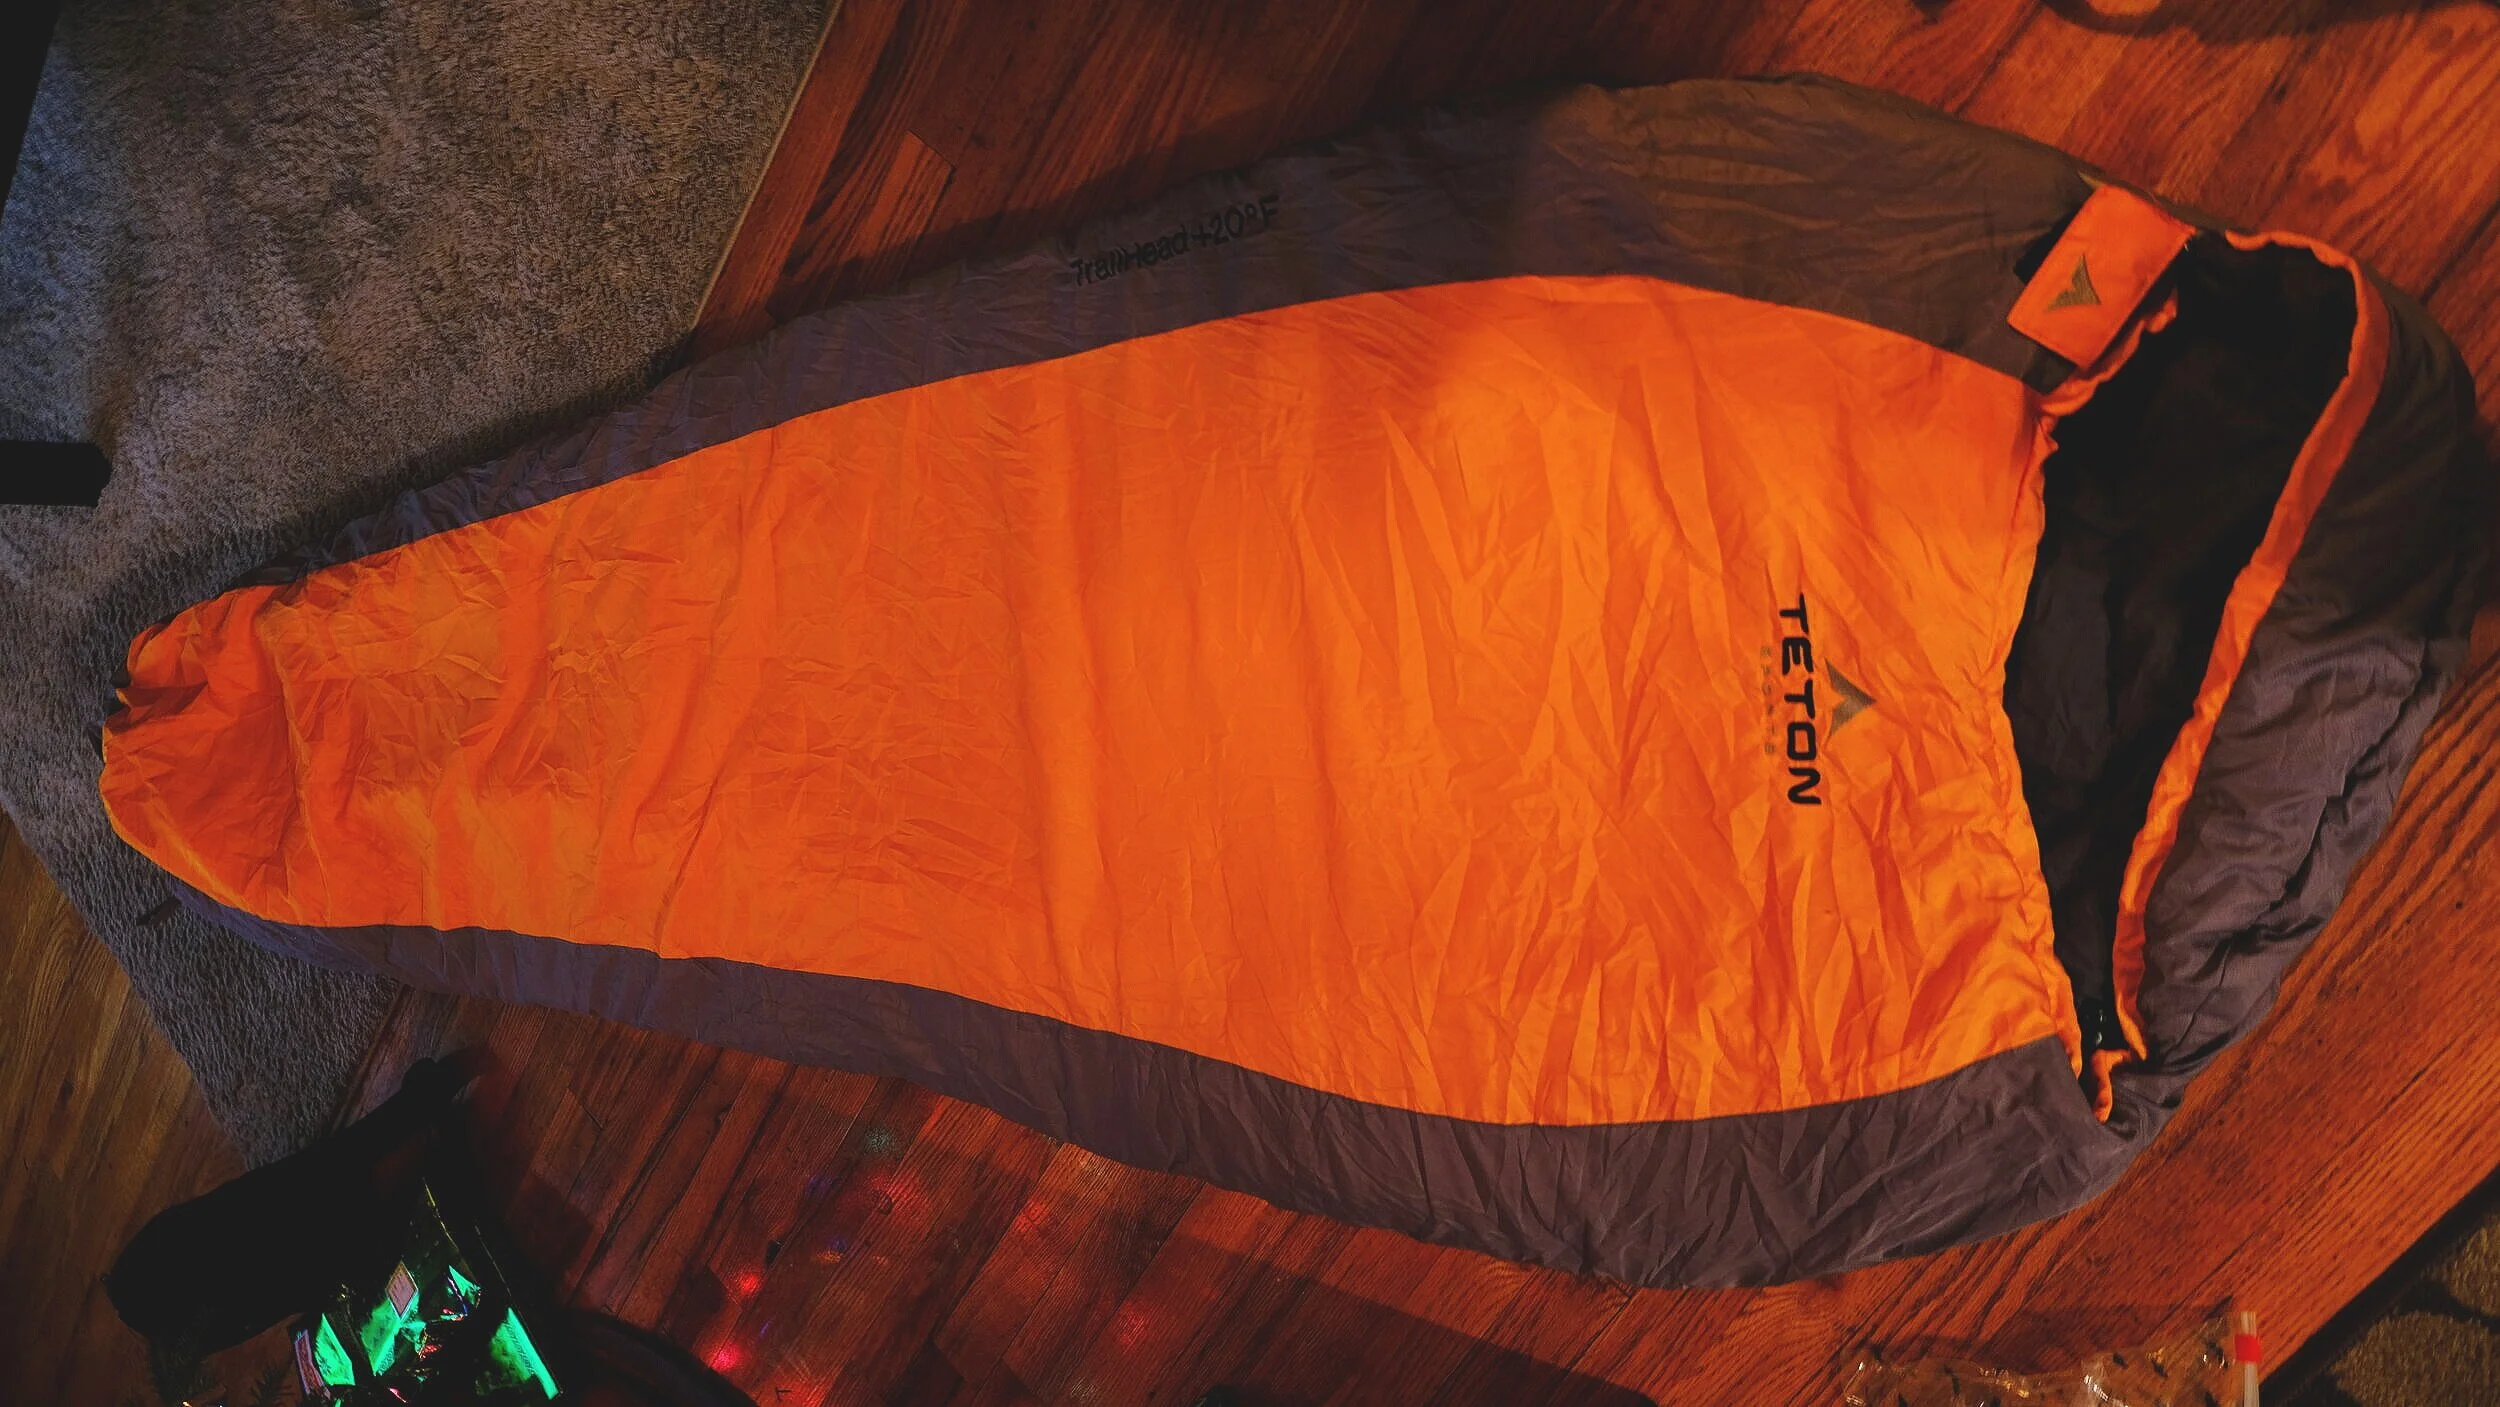
I am using the Teton Sports Trailhead (mummy) sleeping bag. It has a rating of 4.0 out of 5 on Amazon and I paid about $37 for it as an open box. When I researched lightweight, reasonably warm sleeping bags that were affordable the Teton Sports Trailhead kept coming up in the reviews. Additionally, a YouTuber motorcycle rider/camper uses it as his “go to” sleeping bag. He gave it a good review and I trust that. This bag is considered a 20 degree bag. This rating is considered the “extreme” temperature rating. From what I have researched, most bags are sold at their extreme temperature rating. This is the temperature whereby you will most likely not die if exposed to this temperature but it’s not a real temperature for the bag to be used comfortably. The general rule is to add 20 degrees and that is the base limit for a comfortable sleep. So this bag will be comfortable down to about 40F. I alternately purchased the Teton Sports Tracker +5 degree bag. I purchased both at the same time to compare what would work best for me with the plan to return the bag that didn’t suit me best. The Tracker bag is fantastic but it is slightly larger when packed into its compression sack and it is slightly heavier (about 4.1 lbs versus 2.9 lbs on the Trailhead). As always with motorcycle travel and packing, weight and size is a significant issue. There is a small storage pocket inside as well as a draft tube design to keep you warmer.
Originally, some time ago, I prepared to camp down in Big Bend National Park on the way to Mexico so I purchased a Coleman 0 degree mummy sleeping bag. This thing in it’s compression sack is absolutely huge. Packed it is 36” around, 18” long and about 12” wide. There is no way I can travel with it as much as I actually loved it. This was sent back to Amazon.
Sleeping pad
This was one item I couldn’t find for the best price on Amazon. I purchased the Kelty Cosmic Mummy Sleeping Pad directly from Kelty. It is rated on Kelty’s site at 4.8 out of 5 stars. It cost me only about $30 and it has an “R Value” of 4. This is a decently high R value for the price. The R value is the value that corresponds to how warm it will keep you when the weather is cold. The higher the R value, the warmer you should stay as you place this under your sleeping bag keeping you off the cold ground. Kelty has a great reputation within the camping community as I found out through research. This bag is self-inflating and compresses down into its own compression bag. It is constructed of 20d Nylon and weighs in at just over 2 lbs. I’ve never used a sleeping pad before when camping so this is something new to me. I tried it out and it makes a world of difference.
Camp pillow
This is also something I’ve never used or considered. On Amazon (4.2 out of 5 stars), I got a “lightening deal” of just over $11 for the TREKOLOGY Ultralight Inflating Travel/Camping Pillow. This thing when deflated is tiny. How tiny? It folds down into its own bag smaller than a soda can at 5x2 inches. Once inflated with 3-5 breaths, it measures 16 by 12 by 4 inches! It has a non-slip, curved surface to reduce my big old head from slipping off in the middle of the night.
Other camping gear
I upgraded my tent stakes to some Zinx Interlocking glowing 9” tent pegs from Target for about $8 (I think). I purchased 3 bags of Instafire Fire Starter (as seen on Shark Tank). Not sure how I’m going to use this yet since I’m not bringing cooking gear with me but maybe I can start a little fire somewhere. It’s pretty cool regardless and each bag was only $1.50 at Target. On Amazon I purchased two travel towels for $10 each. One is slightly larger at 20x40 inches by Youphoria and the other is smaller at 15.7”x31.5” by a company called 4Monster. Both are very compact in their own carry sacks (Youphoria is a soft mesh sack with a tightening drawstring and the 4Monster is in a small zippered hard plastic case), both are microfiber and they appealed to me because of their tiny packed size and the fact that they dry super quick. For additional comfort and warmth I purchased a Tough Outdoors XL sleeping bag liner for $17 on Amazon. This item received 4.3 out of 5 stars and is basically like a compactable sheet set with a mummy type hood. I purchased it not just as another layer in my sleeping bag for warmth but as a cooty keeper if I slept on any questionable motel beds. It is machine washable and easy to dry. It is compacted into its own carry sack.
Clothing
Shoes

What to wear on my feet
Definitely one of the more difficult decisions to make.
What shoes to bring has been one of the more difficult decisions. Most of the time I will have my Gaerne Adventure Boots on. As previously stated, I purchased these boots because they are known to be more comfortable for walking around. So, when I’m off the bike for a short while I’ll use these boots to get around.
However, when I’m off the bike and checked into a motel/hostel/campsite I’ll want to wear something more appropriate.
What shoes to bring was one of the most difficult decisions. Why? Because they take up so much room in my nightly clothing duffel. Space is at a premium when it comes to what I can fit inside this bag. I needed shoes and sneakers that were comfortable but also compact enough. I don’t think I did a great job in this respect but I did what I could do.
For exercise, hiking, etc. I chose to bring my Nike cross trainers. They are super lite weight, comfy, broken in and they are pretty compact.
To walk around at night after checking in to my motel I wanted something that was more formal than neon sneakers and I settled on some Cole Haan sneaker shoe things. I’m not sure what these are. Are they shoes? Sneakers? Who knows, but under a pair of decent travel trousers they should be just fine in allowing me to respectfully walk inside a church at night to sightsee or walk into a decent restaurant should the need arise. They are fairly light, pretty comfortable and somewhat compact.
The O’Neill flipflop sandals are to be used as shower shoes when I hit a sketchy shower situation and for the occasional romp on a beach somewhere. They are light and flat enough that there was no indecision in packing them.
Pants

Pants, shorts and the other
The thing about finding pants for this trip is that they have to be selectively versatile. It took me a while to find the best pants. I needed a combination of something that is lightweight, something I could wash in a motel sink to dry by morning. wicking, durable and something that looked respectable enough for a night out on the town taking photos, dipping into a church or going to a non-dive bar.
The pants I chose were Eddie Bauer travel pants. I bought black and grey for versatility. They are perfect. The other pair of pants on the top in the photo above are the convertible (bottoms zip off to become a pair of shorts) Columbia travel pants. The Columbia’s are left over from the last journey and they are emergency pants only. Since the last trip I found out that these convertible, zip off the bottom pants are viewed as crazy, “dad” pants. To wear them properly I would need one of those tourist Indiana Jones hats and a fanny pack. I’m not ready for the dad look yet so those are only for the most extreme emergencies.
I brought one pair of shorts and they are Columbia, on sale, quick dry shorts. They look like they can double as a bathing suit (they will) and what sold me on these shorts is that there is an integrated bottle opener that is attached to the shorts. And, get this. The bottle opener has it’s own little pocket for safe keeping! Sold! I can see it now. A surf dude comes up to me sitting at my beachside, restaurant table and says, “Bro. I have this bottle of beer and no way to open it!”. And I say, “wait my bro, hold up. Let me break out my little integrated bottle opener here built into my shorts”. And he says, “Dude. You are way awesome. Want to come to a crazy beach party tonight? Bring your shorts”.
Shirts

A little mix of casual, comfy and semi-formal (ish).
I’m bringing four shirts plus whatever I wear while I’m riding. I chose a short sleeve, navy polo by Ralph Lauren, a long sleeve Henley by Ralph Lauren and I purchased two (the red above and a green) Wrangler long sleeve travel shirts. Yeah, yeah, I know it’s Wrangler. I’m not a cowboy, I’m a Jersey guy. But I looked and looked for the right travel shirt that was sink washable, quick drying, ventilated (it has weird gill mesh type ventilation in the back that is only visible if I make an Incredible Hulk pose) and affordable. I was at our local Shrewsbury, NJ Tractor Supply store getting my little Cannoli the wonder dog some food and bringing him for his $10 dog bath when I spotted these Wrangler beauties. Honestly the shout cowboy at all. You would think they were a normal brand if they didn’t have the little Wrangler tag above the pocket. They fit every criteria I was looking for. And, they were 40% off. Plus the cashier screwed up and gave me some extra discount so they came out to be only $13 each! What?! Sold. And they look the business and I don’t look as fat in them. Done and done.
Workout gear

Clothes to sweat in
By bringing dedicated workout clothes I will have no choice.
These don’t take up much room. By bringing them, since space is at such a premium, I’ll be mad at myself for not working out and I’m too cheap to get rid of them if they ultimately are decided to take up extra space. I’m stuck with them therefore I will use them.
For shorts I’m bringing a comfortable and compact pair of Reebok shorts. I’m bringing a pair of no-show Nike and Under Armour socks that dry easily and are tiny. I’m bringing a basic Under Armour t-shirt that is well worn and makes me feel nice. I’m bringing a long sleeve, merino blend 3/4 zip workout shirt so I can feel official. And I found some cheap, quick-drying neck gaiter thing that you wet and wear to keep you cool.

Those undergarments
Don’t be a pervert.
Nothing to say here really so stop being a perv. I brought an adequate amount of underwear that is wicking, quick-drying, compact and okay looking if you like what looks like a fat UFC fighter. That’s all you need to know. They’re packed.
Security features

Pac-Safe security features
These are the Pac-Safe bags I use for security. The bag is a valuables, lockable bag for the motel/hotel room to put items in and cinch/lock closed.
The clear window Pac-Safe 120L Pac-Safe is to use for my overnight duffel to secure it to the bike while I’m at border crossings.
The other Pac-Safe mesh is to lock up my backpack with camera equipment and laptop in the motel room while I walk around town taking photos.
Some of the security accessories I use are Pac-Safe wire mesh bags to lock up my bags in the motel room and to the bike while I’m at border crossings. I have a donated Pac-Safe valuables bag to lock up some of my things while I wander about during the day. The basic way these Pac-Safe items work is you place them inside the wire mesh or wire mesh bag, cinch it closed and wrap the cable around a fixed object with the included padlock and lock it up. It’s not fail proof but it offers a decent deterrent.
I have various cable/combination locks to secure my spare tire to the back of the bike, to secure the tank bag to the bike, to secure the zipper closed on the tank bag, secure my overnight motel bag to the bike while at border crossings and to secure my helmet to the bike should I decide to leave it behind while exploring.

LOckStraps helmet lock and cable combination lock
The Lock Strap is to lock my helmet to the bike and the combination/cable lock is to lock the tank bag to the bike.
camera/video equipment
For camera and video equipment I’m using a TomTom Bandit Action Cam on my helmet. I have a Polaroid Cube Plus 4k for general use and mounted on my backpack front-facing strap on a PolarPro mount. I have an Olympus TG-5 Tough camera attached to my tank bag for pictures as I ride. The Tough TG-5 is waterproof, freezeproof and drop proof. It really is a tough, all around point and shoot, 4k camera.
My actual photography camera is a Fujifilm XT-3 weatherproof APS-C, 4K camera. I love this camera since moving to this from my Canon full size sensor camera. I’m bringing along the 18-55mm standard image stabilized I’m also bringing along my 12mm Rokinon, wide angle lens for some astro-photography and wide angle photos. I purchased the Amazon Basics, small carry bag to walk this photography equipment around.

My camera and video equipment
Fujifilm XT3 is my primary photography camera coupled with the wonderful and standard 18-55mm along with a 12mm Rokinon lens for wide angle and astro-photography. I’m bringing along some extra batteries, a charger and some card readers.

My Olympus TG-5 Tough accessories
Here is what I’m bringing for my TG-5 Tough camera. The case will include extra batteries, mounts, waterproof lens covers, charger, mounts and micro light mount.

My Olympus tg-5 tough camera
Here is the wonderful Olympus TG-5 Tough camera. It’s tough - drop-proof, freeze-proof and overall a workhorse of a camera.